Thursday 22 January 2015


WEEK TWO OF MY CRAFT YEAR CHALLENGE  -  GLASS/CERAMIC BIRD FEEDER

Well obviously now that I am a master at drilling holes into glass things, my mind began to wander what other things I could make with my new found skill.  A quick look on the internet and I found these lovely bird feeders made from old tea cups that would compliment my lovely glass flower that I made last week.


I liked the idea of the upside down tea cup with the fat ball hanging from it, so hubby and I visited a local vintage store to find a tea cup trio as I wanted to put a plate on top to protect the feed from the rain.

I drilled holes in all three, grabbed my garden twine and this was my first attempt at a china bird feeder.


It was okay, but it wasn't inspiring me as much as some of the others I had seen online, so I went back to the drawing board to redesign it.  I was inspired by the first picture to have an 'umberella' to protect the feed and also to use cake stand fixings to seperate it all.  I just happened to have redundant cake stand fittings and a nice glass plate already drilled, and this was my second attempt and I like this one much better.  It has a little hook in the cup to hang a fat ball from, the saucer will hold seed and I can't wait to see it in use.


Wednesday 21 January 2015

WEEK 1 OF MY CRAFT YEAR CHALLENGE  -  GLASS PLATE FLOWER/GARDEN ORNAMENT

As we are three weeks into January this is not actually week one, but it is the first thing I made this year so I am going to start here.

My inspiration for this project came from trawling the net, these wonderful creations are all a rage in the good old USA.  They are made from recycled glass plates/dishes/vases.


I was really inspired by these and began to scour the net looking for information/tutorials on how to make them and found quite a few.  I particularly liked this tutorial http://empressofdirt.net/makeglassflowers/

After much research I found that although many people glue their plates together, the best way to do them to make sure that they can stand cold winters is to drill and bolt them.  Therefore I needed to learn how to drill glass and ceramics. I did some more research, there are a lot of tutorials out there on how to drill glass.  I needed a diamond drill  bit and promptly sent the other half to the local DIY store for new drill bits.  We then visited the local charity shops for some well priced glass plates/dishes to play with.  I expected to find loads of it, but it was difficult to find suitable coloured pieces of glass, but we got there eventually. We probably bought more than we needed, but I was envisaging breaking loads before I mastered my new skill.

I also got inspiration and help from this person.  His flowers are lovely, he has a real eye for putting them together, well worth a look for your own inspiration.

https://www.facebook.com/glassflowerguy

I messaged him as I was not sure how to finish the back of the flower off to fit onto a pole and he promptly and kindly replied to my request with a picture and information on how to do it, so a big thank you to him.

This is my first attempt at making a glass flower, hope you like it.


WHAT CAN I DO THIS YEAR THAT IS DIFFERENT FROM LAST YEAR, I REALLY NEED A CHALLENGE.

Well it is January, judging by past posts it is time for my yearly post lol.

Jokes set aside I wanted to set myself a challenge this year, I think I am being a bit ambitious, but I would like to try and craft one item a week for the rest of the year.  I see/hear you all sniggering behind your hands, but I am going to try.  If I can't make something one week for whatever reason I will try and blog about an inspiration for the following week.  So please humour me!!!

Wednesday 8 January 2014

felting an old jumper

I have seen many posts about repurposing jumpers by felting them in a hot wash, so I dug out an old jumper that I no longer wear.  I tried it on before using it to make sure I definitely didn't like it any more.  I was absolutely amazed and highly amused when it came out after washing it on my hottest wash!  It would not fit on a two year old lol


Monday 6 January 2014

Upcycled Denim Dress.

Well, it depends on your opinion whether you think this is an 'upcycled' denim dress, or a 'downcycled' one.

I know what my 70 year old mum would say.  She would say I had ruined a perfectly good dress!

 However, my 22 year old daughter and my 13 year old foster child both think it is amazing.  I will leave you to make up your own mind.

I bought this Marks and Spencers maxi length denim dress off ebay for my daughter a few years ago.  She wore it for a short while then it was left in the wardrobe for years.  So I decided to have a play with it.


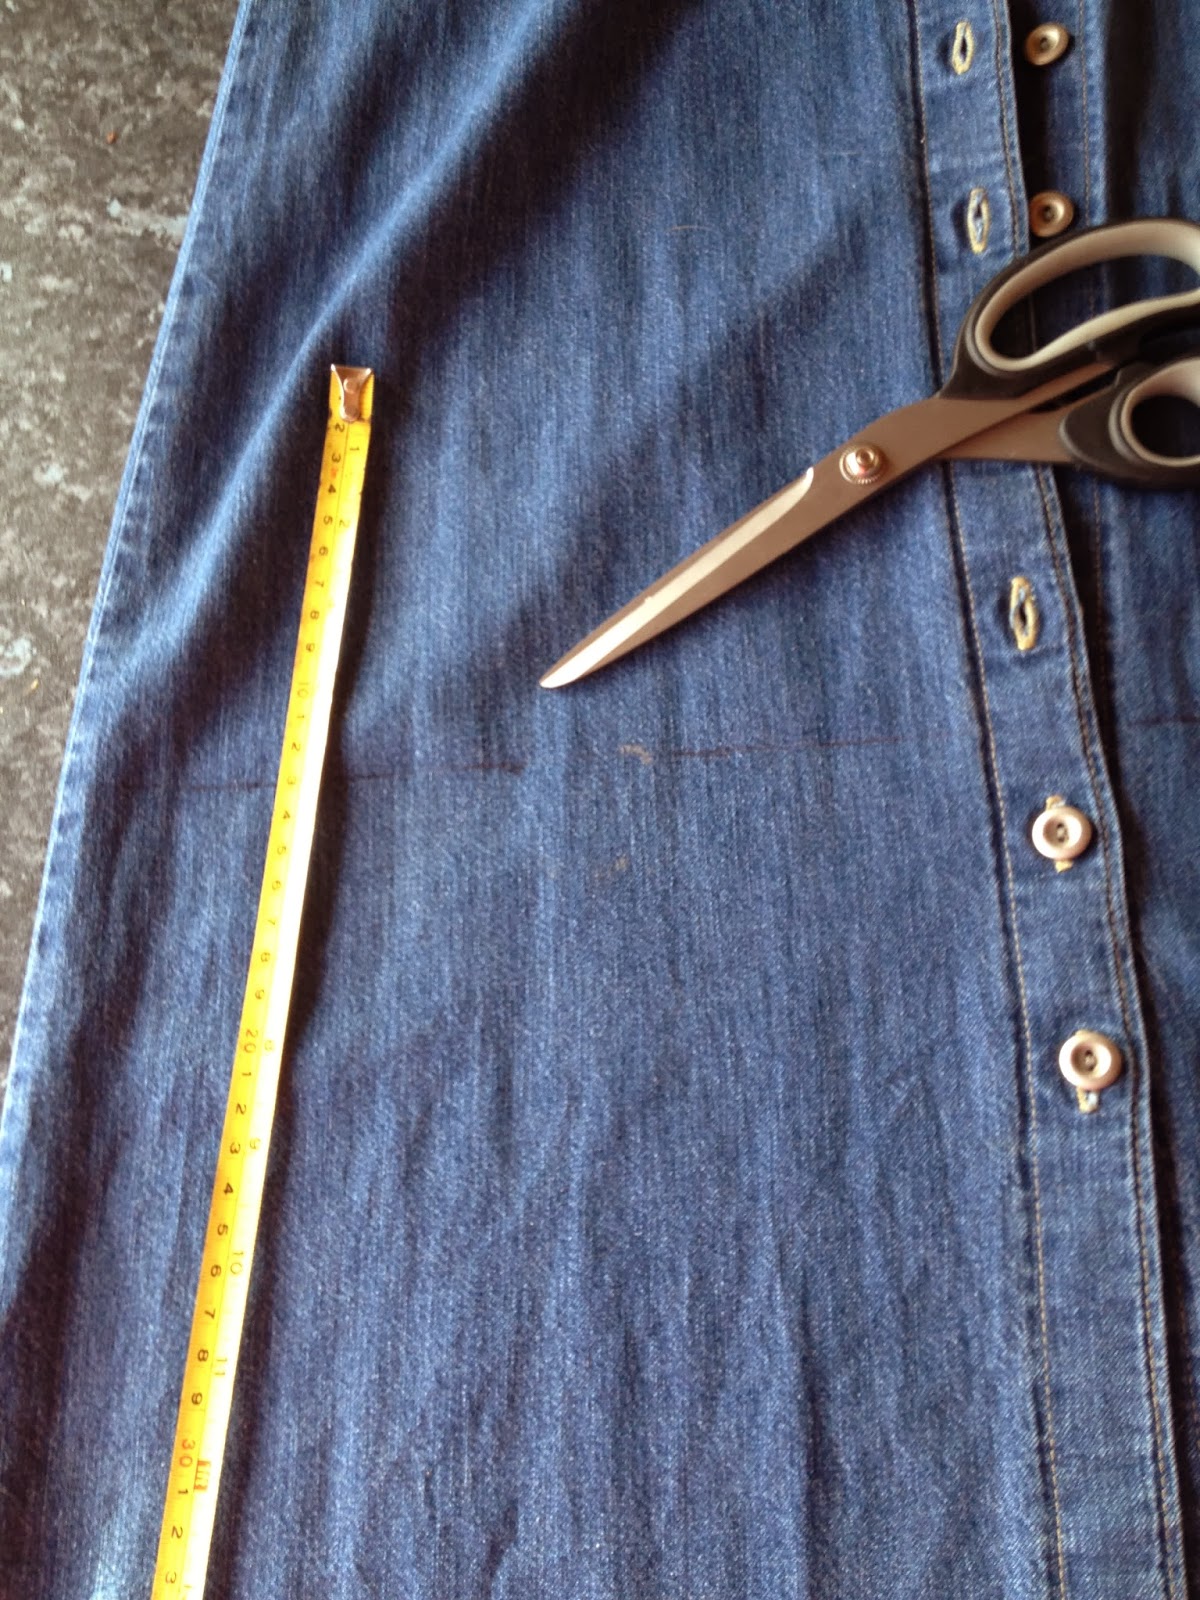
First thing first.  I needed to shorten it.  I measured 18 inches from the bottom right across and joined the dots up to make sure I got it all the same length.


I even did the front and the back of the dress separately to make sure it was even all around.


Once fully marked up, I cut the dress with a little help from my Constant Companion of course!


I have a nice piece of denim left which I am sure will be made into something else.


I then had to start the lengthy fraying process.  I must admit I did not like this bit, I found it tedious and difficult on my arthritic hands.  I got bored of doing and decided I would do some more once the dress was further along.


Once frayed all around, this is how it looked shorter.  I now had to decide what else to change.


After discussion with my daughter, I decided to remove the sleeves.  It was a simple as just cutting it them off, leaving an extremely small amount of material to fray.


This is how the sleeve looked once cut and fayed.


I then decided to distress the pockets a bit.  I put my tape measure in the pocket.


Then with the sharp edge of my scissors I began to rub back and forth to break the threads down.


This is the finishing touch.


I then tried to tie dye the dress with bleach and string.  I failed miserably, below is the result.  This was the first time I had tried and I did not put enough bleach into the water or leave it long enough.  This was the result after bleaching and washing.  So nothing for it, just needed to give it another go!


I asked my wonderful husband to bring some leather bands home for me, and I made the dress look like something resembling Medusa's hair.  When you think you have enough elastic bands on your item, just look, you will find loads of room to add more!


I then made up a solution of one part bleach to three parts water.  I actually used a whole bottle of bleach and three litres of water as I bleached a sweatshirt at the same time.  I left it for two hours then washed it in the washing machine afterwards.  Luckily enough my tie dye bleaching technique worked this time and came out really well.  I may distress it a bit further, put a few holes at the bottom of the dress, but I will let my daughter try it on first and then decide.  


Friday 3 January 2014

Needle felted pin cushion


After needle felting my abstract picture I kept loosing/misplacing my felting needles.  I do have a nice little case for them, but often it's effort to locate and open it!  I realised I needed a pin cushion and decided I wanted to needle felt one.  I browsed the internet for inspiration, there were several pin cushions that were animal's but to be honest I would struggle to stick a pins in a cute animal, I even have trouble needle felting them, especially the eyes! hahaha.  The following pin cushions gave me inspiration for my eventual piece.


I loved all the above idea's.  I liked the idea of a pin cushion in something like a cup or pot.  Unfortunately I did not have any pretty cups left as I had made candles in all of them for Christmas presents, so I found a small terracotta plant pot.  I liked the idea of a little scene like the ones with the rabbits etc, so this was the result:-


A little dinky scene with a little cottage with flowers, trees and a river at the back.  I love it, and had lots of fun making it :)

Needle felting on polystyrene/styrofoam

 I was searching online for inspiration for making more needle felt Christmas ornaments when I came across a tutorial for making these baubles.  They are covered styrofoam balls.  I was unaware that you could needle felt into this medium!  The tutorial for these baubles can be found here it is a lovely site with many ideas.


I had no sytrofoam ball's to hand, so found a piece of polystyrene that had come in the form of packaging and had a go at needle felting it.  As I was just having a practice to see how the two medium's worked together I did an abstract pattern.  In all honesty I was just doodling with wool! This was the result.


Monday 30 December 2013

Crafting companions.

When ever I am crafting I always have loyal companions.  The older dogs are usually happy with just a look and sniff at what I am doing.  The cat and the younger dog however are a different matter.

Often as I craft I feel a tug on my wool and turn to find the cat hanging onto the end of it.  Or I will go to reach for a certain colour of roving to find my deaf staffy cross having a go at wet felting it all on her own.


Needle felted Christmas ornaments


After mastering my new found interest of needle felting during the summer, I dragged the wool and needles out to make some needle felted Christmas decorations.  I used cookie cutters to get the shape, and just needle felted in them.


A needle felted robin and needle felted Father Christmas soon followed.


Crazy about needle felting.

I discovered needle felting this summer. I absolutely love it so relaxing.  I really wanted a needle felt penguin first.  There are many good needle felting tutorials out there on youtube.  I just did a search for needle felt penguin and got some ideas.  I bought my needles and first lot of wool off ebay.  You need wool tops or roving for needle felting, however my penguins beak is made from scrunched up wool yarn as I did not have that colour.  I am well pleased with him for my first attempt and he is really cute.


For my second attempt I decided to keep it simple shape wise, but with a bit more detail and blended wool.  Therefore I made this needle felt owl.  I didn't have to look up ideas for a needle felt owl as once I get the idea of something I am off.  This is a lovely little fellow and they feel so good in your hand being made out of pure wool.


Piddling crocheted frog toilet roll holder

To wee or not to wee, that is the question?!

We have a static caravan in Shropshire and in it I allow all things 'twee' that I would not normally have at home.  It's our place to relax and have a bit of fun.  In the bathroom we have a frog theme going on, so I decided to make something to go in there and this 'weeing' frog is the result.  Much to my 13 year old foster childs dismay!